Simple steps to host your WordPress site in Amazon LightSail

Hello friends,

It is always Challenging to find out good hosting solution which is secure, easy also cost-effective. Amazon LightSail is the destination of all your finding. It is one of the best Cloud Server that provides reliable secure service at the cheapest cost. In this post, we are going to host a WordPress site in a few basic steps.

Before starting in the detail let’s first visit the AWS Lightsail by URL https://aws.amazon.com/lightsail/

Indiandotnet - Amazon LightSail
Now, once you visit the site the first curious questions you might be thinking of the pricing so, let me share that as you can see in the above image first 3 months are free then the basic Linux plan starts with $3.50/month, and windows start with $8/month.

TAs Amazon always tries to give better performance and services so periodically they are adding better and better configuration but as the configuration of machines increases obviously, the price will also increase slightly. to know more about the different plans you can visit https://aws.amazon.com/lightsail/pricing/

I am assuming till now you have registered for the trial and want to host your first WordPress site. so let’s get started.

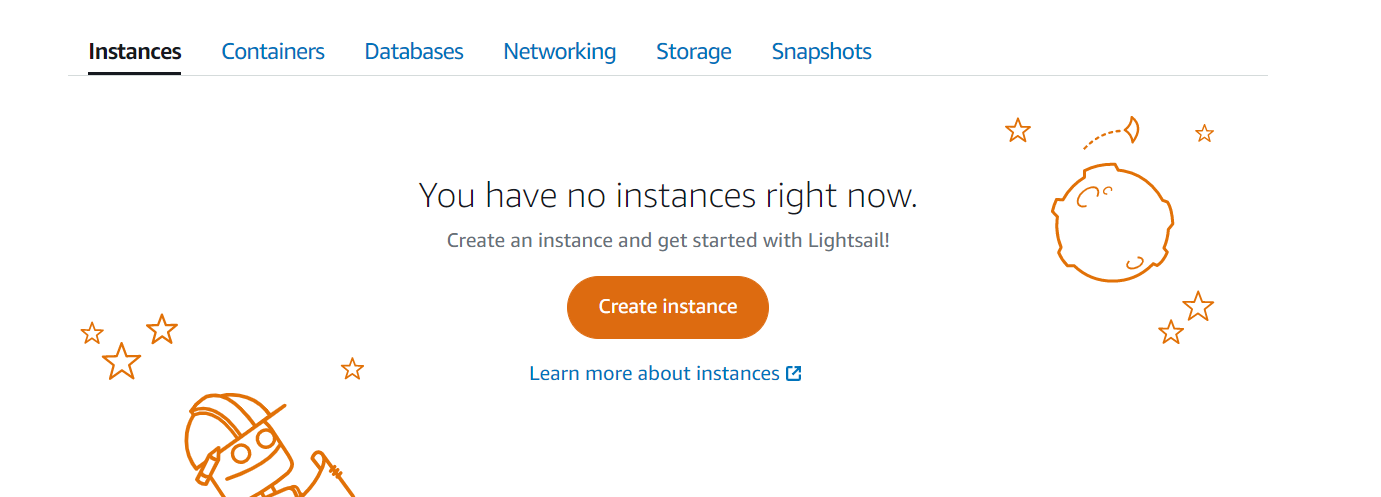
After Login the on the first screen you will find create new instance option as shown in below image

Indiandotnet AWS Create instance
Now, just click on create instance. you will get a new screen where you have to select instance location. By default the location would be your near availability zone but you can change it as per your ease.
Once you selected the location, in the next step we have to pick up instance image. Where we have 2 option either Linux or Windows. As we are going for quick WordPress hosting solution. We prefer Linux.

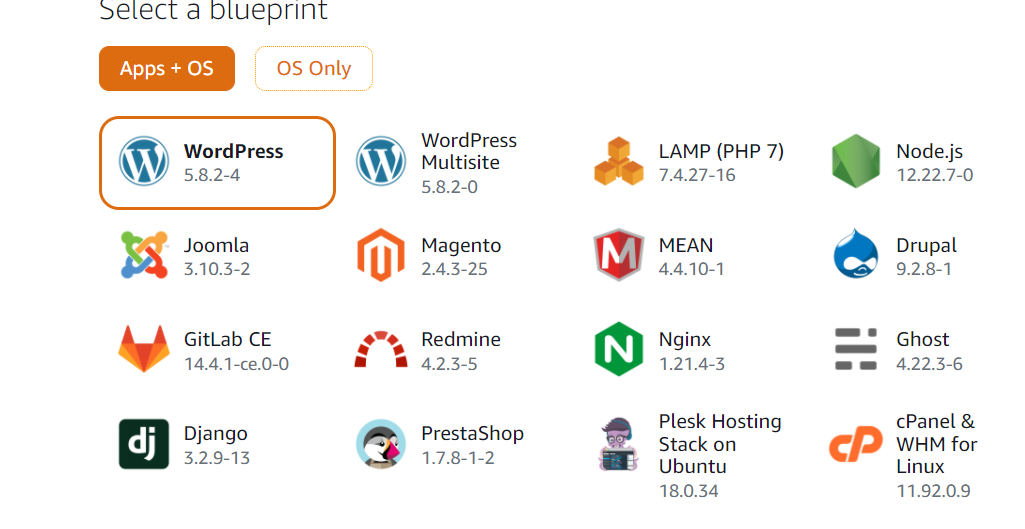
After selecting the OS which is Linux, we will have few other options where we can select predefined images which we can install on our Linux instance. See below image where we have different options available. Here we are selected WordPress (first option)

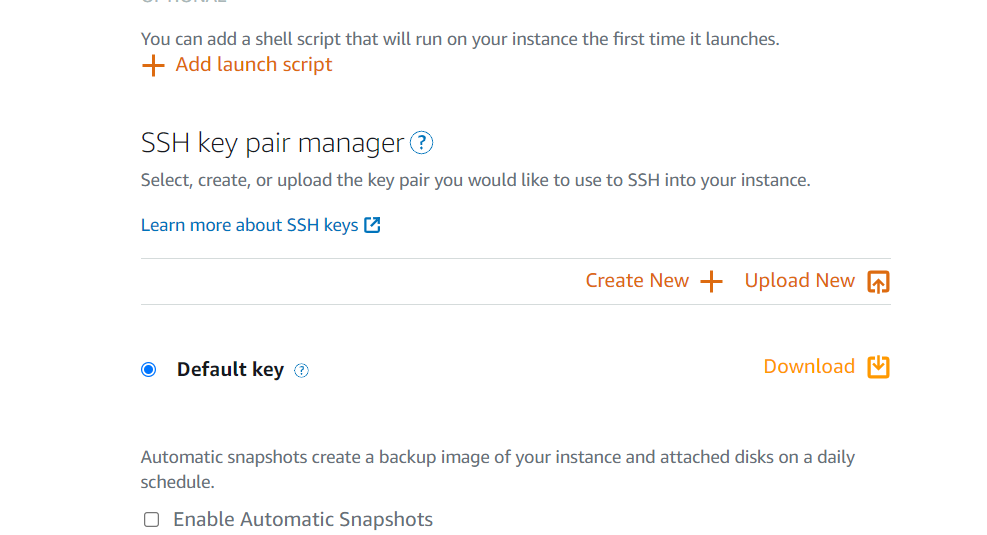
Once the WordPress option is selected, in the next option we have SSH key. If you are not aware of SSH key then don’t worry. Just think it as a encrypted password which we can use to access our Instance (VM)

To make it simple, we will just download the existing default Key.

Once the SSH Key file downloaded to our local machine. In the next step we will select the configuration as shown in below image. As our WordPress instance can run on 1vCPU and 512 RAM so, we are happy to select $3.5 plan which is selected by default. There are various instance available according to different configuration like Memory, Processing, Storage etc. Once you are comfortable with the WordPress installation as per your need you can choose different plans and as mentioned AWS periodically adding new instances as well.

Indiandotnet  AWS LightSail Pricing

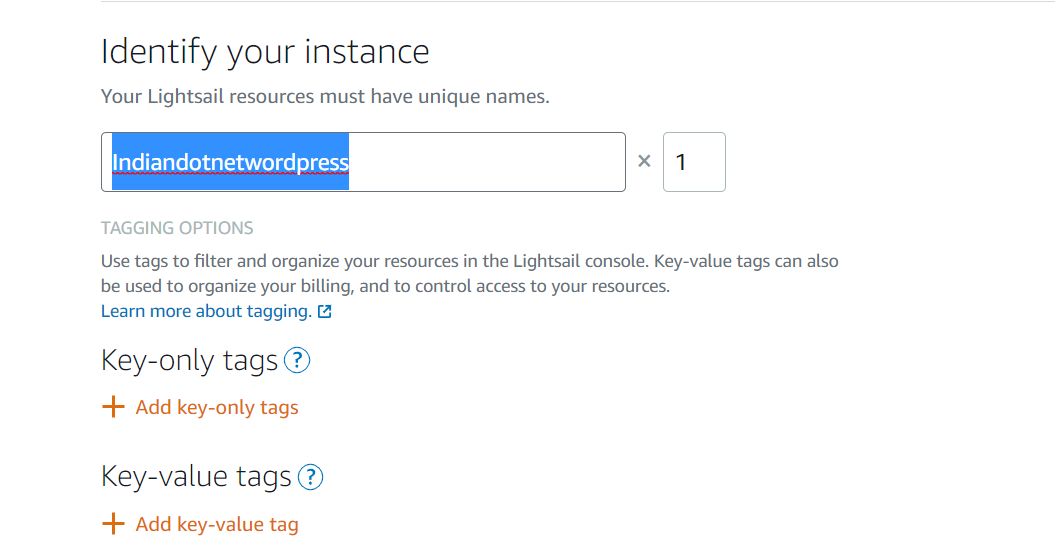
Now, in the next step we will give instance name. The instance Name should be unique here. I am giving my instance name indiandotnetwordpress. Once you provided the instance name just hit the create instance button. In this way your first WordPress instance cretaed.

Once you hit the create Instance button in few minutes our instance would be ready and will be available in Instances tab. You can see below snap our instance in running condition.

Indiandotnet aws wordpress instance running

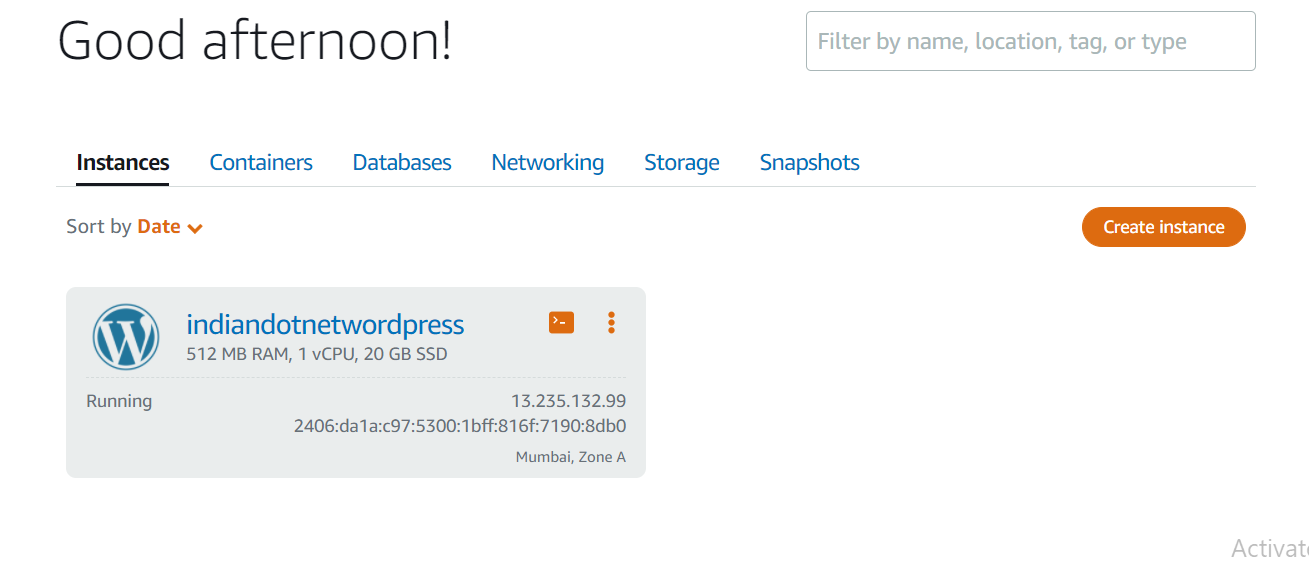
Now, to check whether the wordpress installed or not on our new instance . Just copy the IP address from the instance detail and browse it. if you see above image my instance IP is 13.235.132.99

Let’s browse it

Indiandotnet_WordPress_Instance_Browse

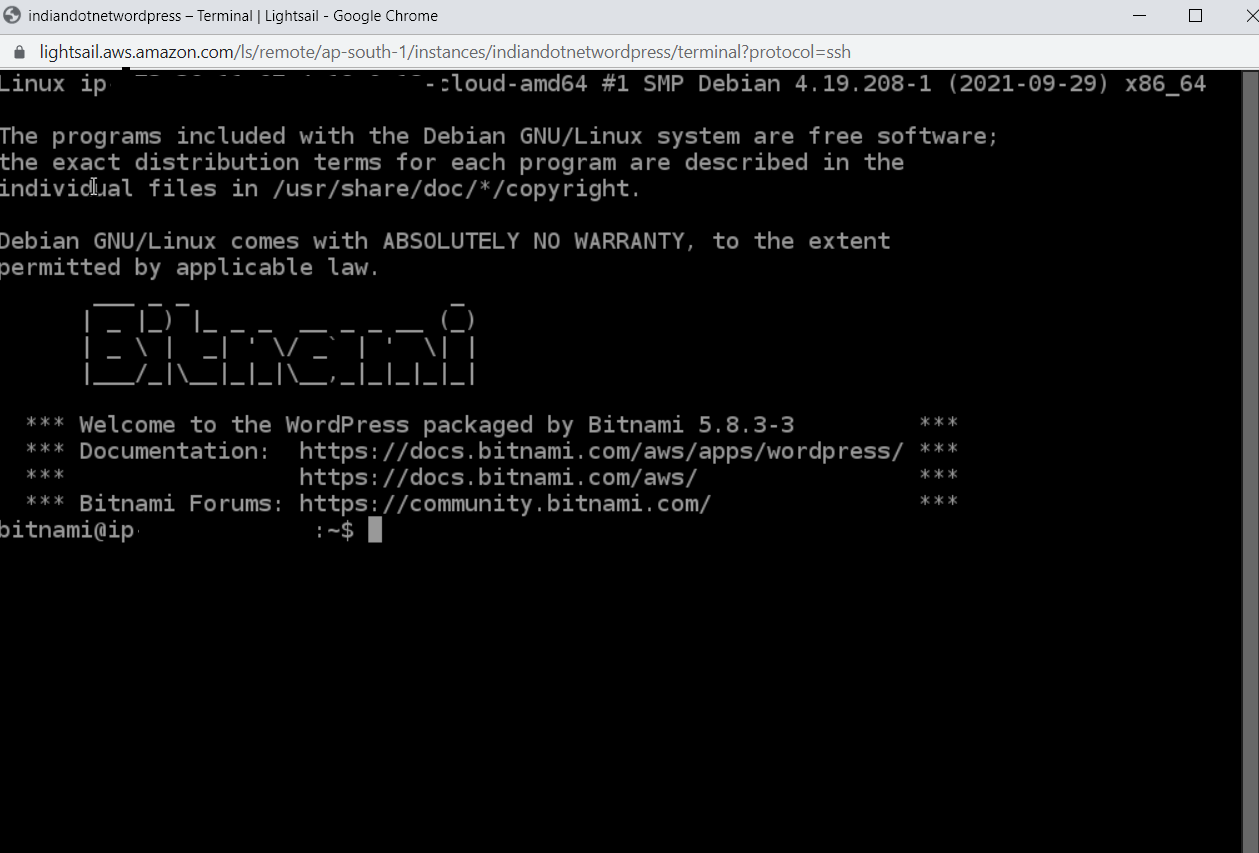
So far so good. Wow in few step we installed wordpress but the next question might be in your mind how to access the admin part of wordpress as we don’t know username and password.

So, to get username and password just click on SSH terminal option as shown in below figure.Which will give option to access our instance.

Indiandotnet WordPress Instance SSH terminal

You will get following screen.

Indiandotnet WordPress Instance terminal
Here, you have to write following command and hit enter to get password of your wordpress admin. The command is cat bitnami_application_pssword
Indiandotnet SSH key access

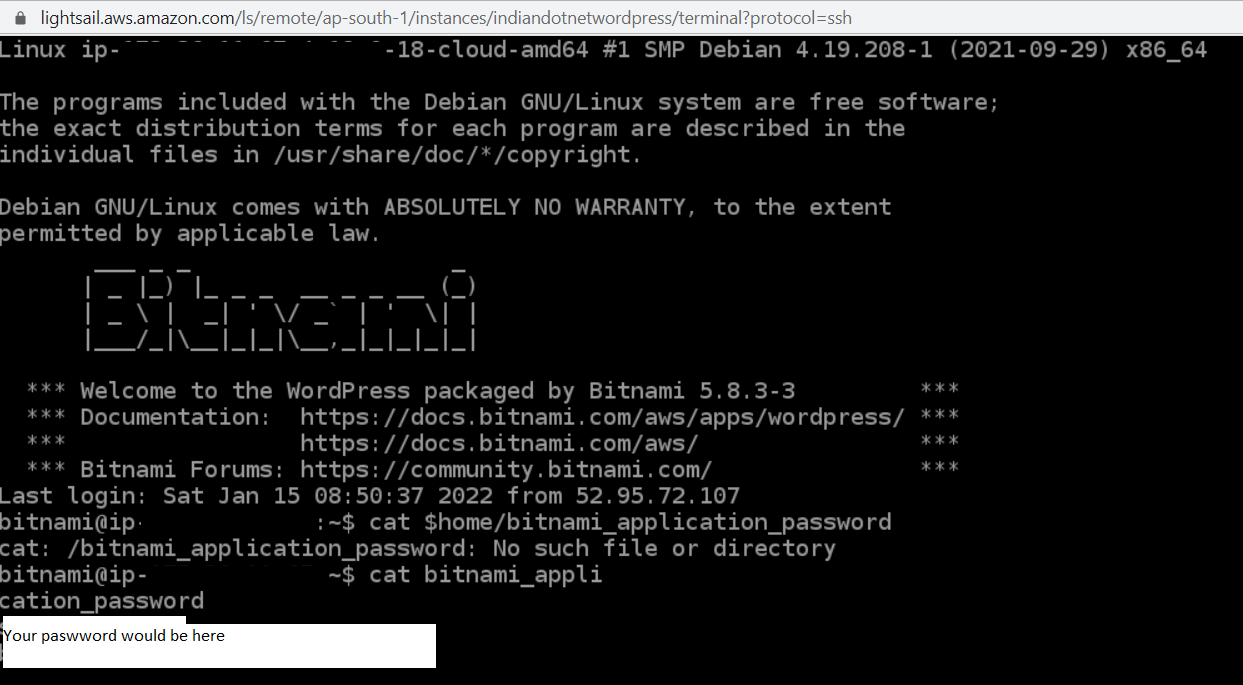
Now, once the password is copied we can access the wordpress.

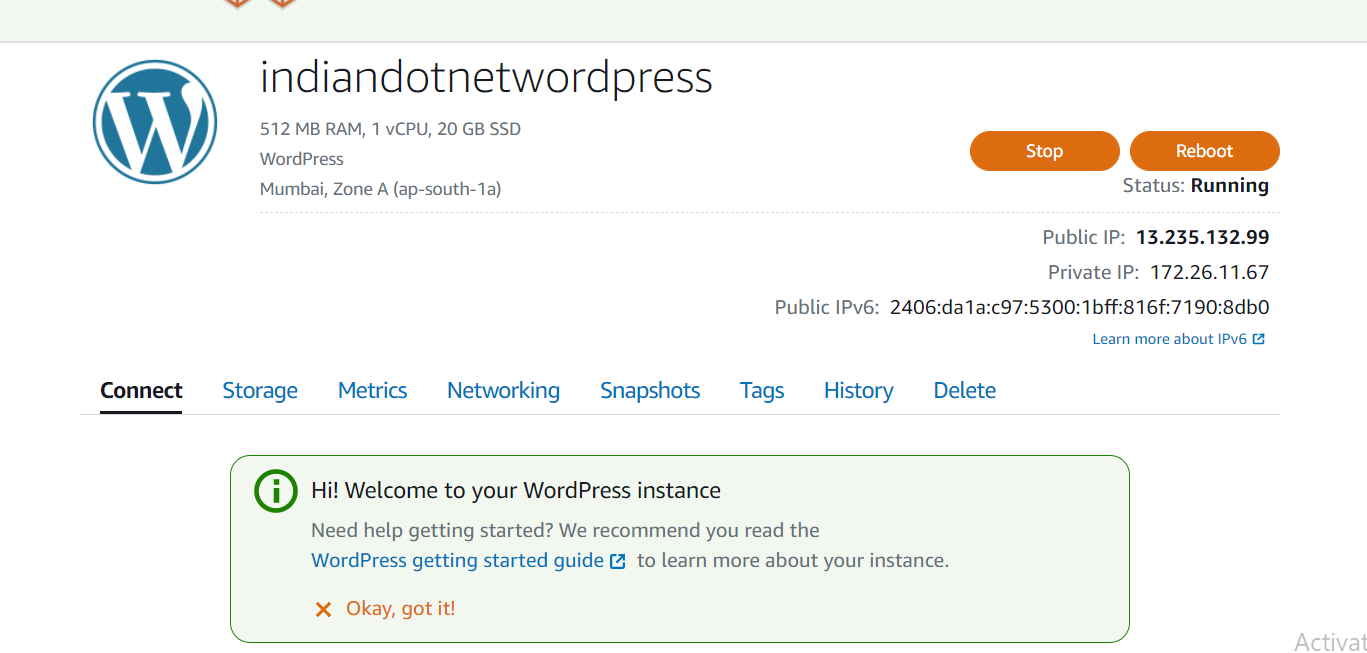
For this again go to WordPress instance and use public URL as shown below

We are using public URL and pasting in the browser with wp-login.php suffix. below page would be open where we have to provide username as user and password which we copied.
Indiandotnet wordpress access

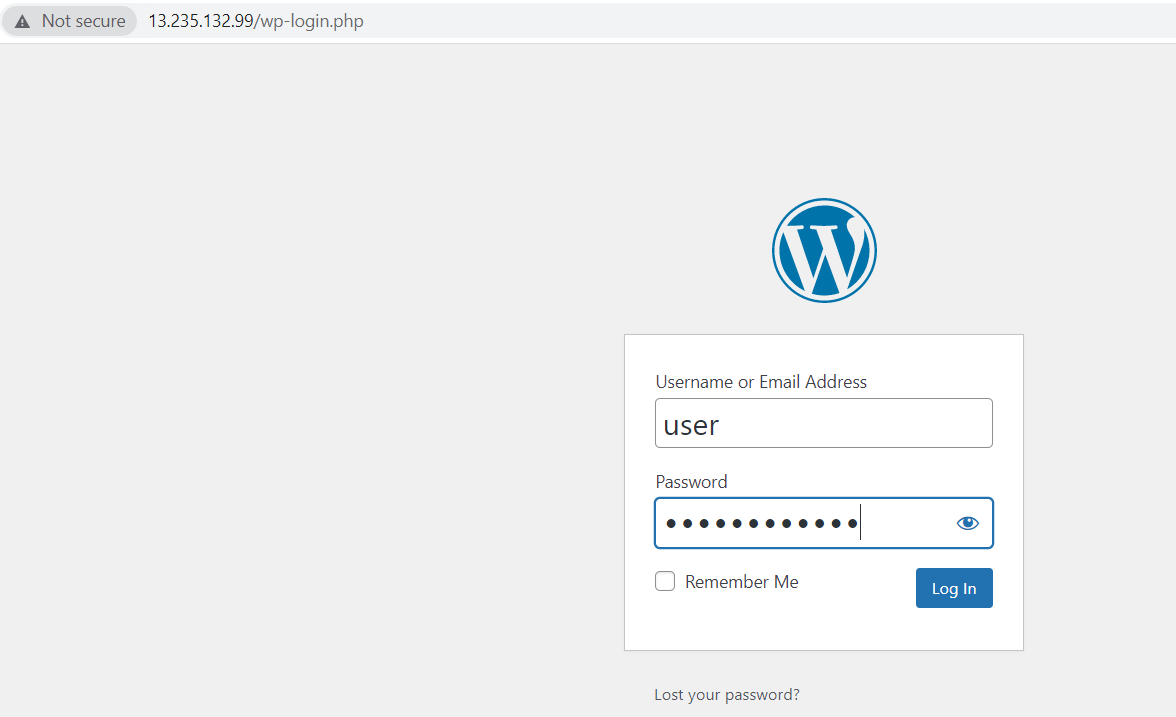
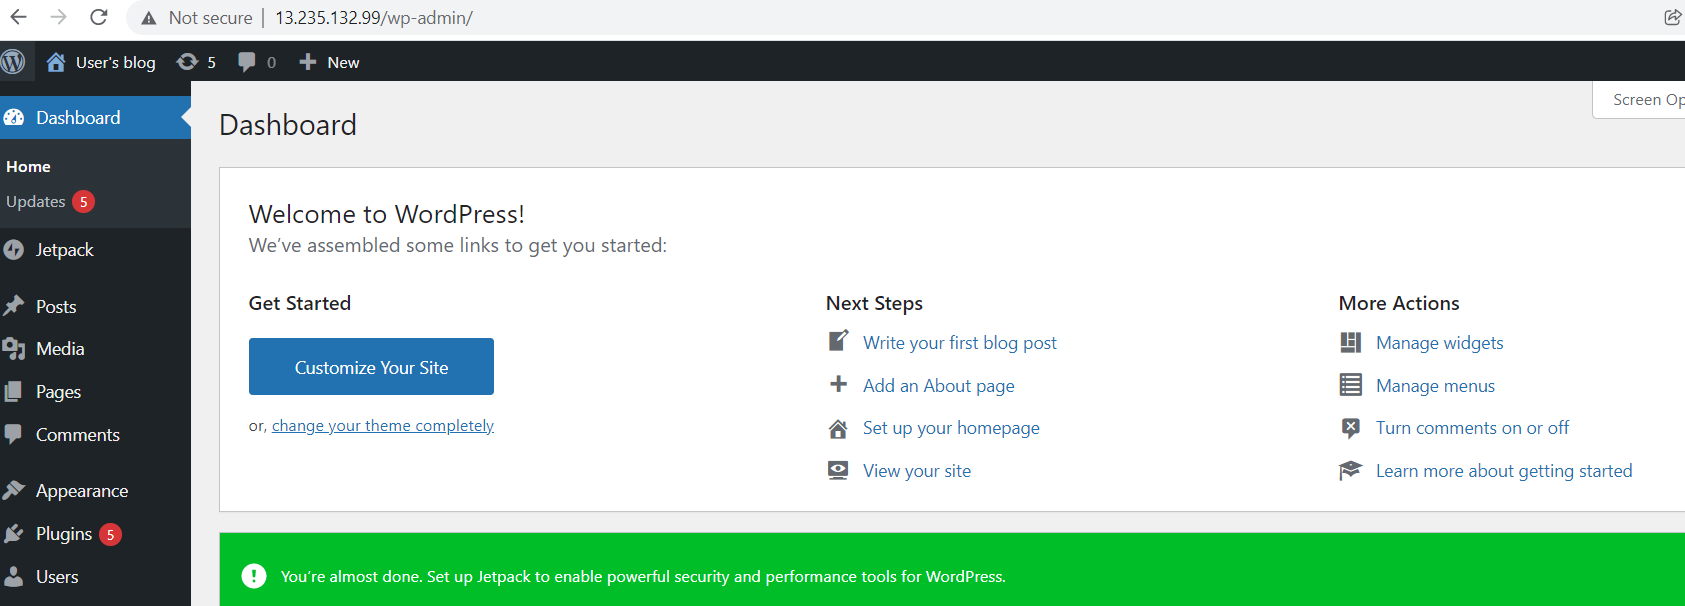
Once you hit the login button you will be in Dashboard of WordPress now. you can manage your wordpress.

Indiandotnet wordpress dashboard
So, far so good in this post we are able to host a wordpress site and able to access it with public IP without any issue. In next post we will discuss about some other aspect light host configure domain name check CPU usage etc,.

Hope this post is useful for you. Please do post your comments.

New sessions in this New Year 2022

Dear Friends,

Wish you all a happy, healthy new year. I would like to share that “Indiandotnet” – “Indore Software Developer Community” has lots of plans to share the knowledge with the community member. We have scheduled various events (in person, online) for this year. Some of the key topics on which we are going to conduct sessions are

AWS, Azure, Xamarin Forms, Machine Learning, etc.

Please, do register for this January month events

  1. Low Code no code (AWS HoneyCode) on 9th Jan (No Code Low Code with Honeycode by Rajat Jaiswal Tickets, Sun, Jan 9, 2022 at 1:00 PM | Eventbrite)
  2. AmazonLightsail an Introduction (16th Jan) (An introduction of Amazon Lightsail Tickets, Sun, Jan 16, 2022 at 2:30 PM | Eventbrite)
  3. Amazon Quicksight an Introduction on 23th Jan (An introduction of AWS Quicksight Tickets, Sun, Jan 23, 2022 at 1:00 PM | Eventbrite)

My Hospitalization due to Covid and myth about Hospital Staff

Hello friends,

I was Covid positive hospitalized in Synergy Hospital Indore Vijay nagar. With god grace and blessing, best wishes of friends and family now, I am discharged from hospital in better condition.

I would like to share my hospital experience with all of you to show another part of coin you might be thinking hospital is great, staff is great, so it is the eye opener post for all of us.

When I was hospitalized on that night, I was very tensed lots of thing happening in my mind, I was shifted in general ward last corner bed.  There are 4 patients already there in the room. Around 1:00 am I thought to go to washroom with the impression Synergy is well know name in our area I entered in washroom as in entered in front of the door one paper was posted of WHO guideline “How to Wash your Hands?”

But the best part is in the washroom there is no soap, no liquid soap nothing to wash your hand. Another interesting thing is the toilet is so dirty and there is no hygiene maintain. Luckily, I had soap somehow managed. I thought, might be tomorrow morning the hospital staff will clean the toilet, refill the soap dispenser, keep odonil or phenol tablets next day but the worst thing is neither hospital nor the staff care about this I requested multiple times but till the time I was discharged no one came to clean the toilet.

So, the crux of the above point is we can have poster of WHO for cleaning the hand, but the hospital does not bother about hygiene, cleaning of the toilet.

Next, day morning I just started chit chat with other patients. Mr Radhe shyam Parmar aprox 55 age came from ICU, He was not able to sit till the time I was discharged had urine bag with him. He is not from Indore his wife and kids are there for his care in the hospital.

Next to me Mrs Vrinda aprox 60+ age also came from the ICU. Aashutosh singh age aprox 29 belong to Praygraj also hospitalized couple of days back in the same room.

In 1-2 days we started chatting and a friendly atmosphere created. One day Mrs. Vrinda was weeping I just asked what happened Amma. She replied from last 2 days I am requesting Nurse that I need to be fresh but no one helping. As she came from ICU and her urine bag is also attached, she was not able to walk till toilet but no one helping her from last 2 days due to which she was not eating the food properly.

After few hours a lady came who is doing cleaning there Mrs Vrinda offer her money then she helped her for toilet.

Isn’t it sad you are helpless and until unless you are not offering the money hospital staff will not help you?

Luckily, Mr. Parmar wife was there who clean his urine pouch, helped him to get fresh but still she was listening the lecture from Nurse that spread room freshener.

Another, great thing in when shift change in the evening the 2nd shift staff’s day start around 11:30 pm. If you are sleeping they awake you ask you have you taken tablets and then start IV bottle which may take 45- 60 minutes (sometime more) so you can’t sleep till that time.

One night, I slept in the middle around 2:30 AM I woke up and found the blood is flowing in the IV pipe. I immediately went out to reception for seeking help and the Nurse said it is normal. You have to take care next time if bottle is going to finish switch off the syringe.   

It means you have to take care of this we don’t have time to revisit and check the bottle status.

My brother came daily in the hospital for giving me tea, breakfast lunch dinner etc. One day, I was taking my lunch I asked Ashutosh (as he opted for canteen lunch came from out side indore) how much they charged for the food. He said 500 rs per day. I was shocked I asked really ?

I asked him what you get daily in 500 rs. He replied

2 times tea (15 rs X2 = 30 rs)

1 breakfast (Poha/Idli/upma)(40 x1 = 40)

1Lunch plat & 1 dinner plat (3 chapatis, daila,dal,subji) (100X2=200 rs)

I thought, Indore is foodie’s city the max amount would be 270-300 rs but the patient is giving 500 rs why?

Next day I asked Mr. Sharma (Canteen person) why you charge 500 rs but he has no answer)

On the same day Mrs. Vrinda was going to discharged she was very happy but unfortunately, she has to wait till mid night 1:00 AM. The reason is very funny. Her family was giving cheque of remaining amount, but the hospital was not accepting it.

I curiously asked his son to show the bill and I laughed a lot. Because the same type of treatment is receiving everyone in the room so the same amount would be added in everyone’s bill

Let me show you some interesting facts

  1. Nebulization (Morning /Evening ) 200rs for each time (Morning/evening) .It means if you stay  for 10 days then your nebulization charges are 4000/rs while nebulization machine if you want to buy it will cost you 1100/-rs
  2. Glucometer (Morning/evening/noon) 150 rs for each time means if you stay for 10 days in hospital 4500 rs

Another interesting thing is your medicines you don’t know how much medicines came used nothing, but I got bill of 23K of medicines only.

While last 2 days I didn’t take any IV bottle , murabid nothing.

Next interesting thing is PPE kit charge per day 1500/- for doctor while the doctor never came with PPE kit. Another interesting story is the PPE kit 1500/-rs charged for each patient. I don’t know how frequently the doctor change his PPE kit in general ward like superman.

Although, In the mob of greedy staff there are couple of good people also exists who are very serious about their job and humanity. I would like to thank all those super heros.

The reason of sharing this to make you aware that if your family member is admitted in the hospital then you must check time to time in the hospital. Money is secondary but the life is primary, helping patient is primary responsibility.

I don’t know what these people will do with this money which they are getting.

Specially, in this pandemic where life and humanity is important some people are just making money and not doing their job with honesty.

I pray and wish you all protected from this covid and healthy.

God bless everyone.

Online Power BI Learning Series

Dear All ,

Let’s join us to learn something new in coming weeks. We have few schedule sessions for the community which might help you somewhere in your day to day work.

Let’s join us to learn Power BI. 

In the series of Power BI learning we will start from basic to advance and share a live demo on COVID analysis.

powerbi

Do register yourself on following events

https://www.eventbrite.com/e/an-introduction-of-power-bi-tickets-118776899905

https://www.eventbrite.com/e/different-charts-in-power-bi-tickets-118801700083

https://www.eventbrite.com/e/bookmarks-in-power-bi-tickets-118801852539

https://www.eventbrite.com/e/tooltips-in-power-bi-tickets-118801954845

https://www.eventbrite.com/e/web-scrapping-in-power-bi-tickets-118802083229

https://www.eventbrite.com/e/covid-analysis-using-power-bi-tickets-118802181523


Looking forward for your participation.


Enjoy learning 🙂


A Beginner step towards Alibaba Cloud OSS (Object storage services)

Objective: In this post, we, try to understand what is Object Storage Service in Alibaba Cloud and how to create your first Object Storage Service. We will try to understand the different business scenario where we can utilize this OSS service.

Prerequisites: The first and most important requirement is that you should have Alibaba Cloud account handy with you.

Now, as we are pretty much clear with the objective of the post and perquisites so, let’s understand what is OSS (Object Storage Service).

As the name suggest OSS (Object Storage Service) is the API service provided by Alibaba Cloud to Store different objects. It is one of the famous and unique storage services. You can store any object, any amount of data. The object can be anything which can be store for frequent access or backup or Archive any purpose.

Now, let’s understand this by different Business scenario , suppose you are running a shopping cart project where you have lots of images of the products then those images can be upload in OSS and one of the great feature which you will not find any other Cloud Storage service is that you can do image processing as well at runtime without writing a single line of code.

Similarly, You can store your shopping cart’s invoice backup or data backup. Or If you are doing any signing agreement with your dealer of sub-dealer then the singing contract pdf, image, etc can be stored in OSS.

Now, before going Alibaba Cloud Console let’s understand some other terms or properties to understand OSS

KeyTerms

Bucket:- The first and most important term is Bucket. So, whenever you create an OSS you generally create a Bucket where you are going to store Objects.

Storage class:- Storage class you can think like usage of object access frequency there are 3 types exists in Storage class

  • Standard:– Standard like the object which you saved in the bucket can be used frequently. For example, if you have Instagram like the site then the images can be saved in Standard class account.
  • Infrequent Access:- This you can think like a life cycle to store the object is high but it will be accessed infrequently. Means, not very often. Although, there is a minimum storage duration limit is 30 days.
  • Archive:- As the name suggests it is just for storage purpose only. The chances to access this object is very rare. Similar to the IA class, Archive has a minimum of 60 days storage duration.

Now, You can think the above classes type like Hot & Cold access. Now, depending upon the accessibility and storage the charges will vary.

Region: Now, the region is like a geographical location where the object primarily saved and access. Alibaba cloud has various region available.

End Point:- The endpoint is nothing but the URL (Domain Name) by which the service will be accessed by us.

Access Key: Access key is nothing but Access key ID and secret. which ensure the service is accessible by an HTTP request.

Below are some of the features

  • High availability 99.999999%
  • No storage Limit
  • Hight throughput and low – latency access performance (although for Archive Latency can be in Minute for other classes it is in MS)
  • Support HTTPS
  • We can process images as well (except archive class)

Accessibility of Storage: We can access the storage by following ways

  • https URL
  • SDK (we can use different programming language)
  • OSSBrowser (A Graphical tool to access OSS just assume like file browser)
  • OSSCLI ( Common Line Interface tool)
  • OSSFs (Is tool to mount storage to your Local File system which you can access like any other drive)

Now, without wasting the time we are going to see how to use OSS. Let’s start step by step

Step 1:- Open https://account.alibabacloud.com/login/login.htm and provide your valid username and password.

Indiandotnet_OSS_Login

Step 2:- After Login click on Console option on the top. You will get the following screen. Where you have to select Object Storage Service

Indiandotnet_OSS_Console_2

Step 3:- After clicking the OSS you will get Dashboard. Which give you the option to create new Buckets, see existing buckets and bandwidth /Storage consumed so far.

OSS_Dashboard_Indiandotnet_3

Step 4:- As we need to create a new Bucket to click on Either + symbol on the Left side or option create a bucket on the right side.

OSS_Create_Bucket_Indiandotnet_4

Here you can provide the unique bucket name provide the region, storage class and Access Control List as per your need. Once you filled the details click the OK button as I did in the following screen

Create_Bucket_Indiandotnet_5

Step 5: After clicking the OK button our first Bucket is created with the name “Indiandotnet”. You will see different details and option.

Indiandotnet_Bucket_6

Step 6:- Here, we will click on the Files tab.

OSS_File_Option_7

We can see a different option like Upload, create Folder, etc. Just below to that we have existing uploaded files detail.

Now, let’s try to upload a file by clicking upload button available on the screen.

Step 7:- This is the best part which you will agree. We can upload the file either on the root or any specific folder. Apart from this, we can control the Access of the File from private, public read, public read /Write

Upload_File_Option_Indiandotnet_8

Step 8:- Just upload any file you want. After upload, you will find the file details in the grid as shown in below screen.

Uploaded_File_List_Indiandotnet_9

Step 9:- Here, when you click on More option next to the file row you will find a context menu with different option as shown in below screen. We will discuss those option later but for current interest just click on Copy File URL.

Indiandotnet_OSS_File_Different_Option_10

Step 10: When you click on Copy File URL you will get URL of the file as shown in below screen. Just copy the URL and access the file.

Indiandotnet_Copy_URL_Option_11

So, After reading the above steps and details you will be able to answer the following questions

What is OSS (Object Storage Services)?

What are the Key terms Of OSS?

How to Create our First OSS?

How to Access your file using HTTPS URL?

In the next few posts, I am going to describe some more tips which will be helpful to answer

How to process uploaded image at runtime? a very exciting and unique feature which I doubt supported by any other cloud provider.

How to access the storage programmatically via C#.

Please, provide your inputs on this post and wait for a few exciting posts related to Alibaba cloud Object Storage Service.

Learn how Microsoft flow can make your life easy–A free learning event

Dear Friends,

With the aim of learning and sharing, Indiandotnet group & Indore Software Development Community brining a new event for you.

This event will help you and your client to improve the productivity and automate your day to day work.

Please, feel free to register the event using URL http://bit.ly/2GaxIxZ

My Post (1)

We are very thankful to our venue partner Sky Space co-working https://www.skyspaceoffices.com/ for providing the venue.

Logo Color Light - dark bg

Your Benefits

1. Free skill development

2. Meet talented like minded people and increase radius of your circle

3.Grab the opportunities of job and know latest trend

I hope you will join and grab this opportunity.

Indian Prime Minister 2019 Live Poll – Analysis using Microsoft Form, Microsoft Flow and Power BI Live

This is currently, the hot topic in India who will win the 2019 election of India and become Prime Minister. Although, 90% of people know who will come again Smile.

This subject gave me an opportunity to use my favorite tools Microsoft Flow, Power BI, and Microsoft Form.

Our aim is here to create a flow which is responsible for capturing the response from Microsoft Form and send it to Power BI stream dataset.

Or we can say the give live stream response of Microsoft form using Microsoft Flow to Power BI and show live trend dashboard by passing stream data to Power BI.

Isn’t it interesting?

I am so excited So, let’s get started.

Prerequisites: Surely, you need the following the account to work further

1. Microsoft flow:  You need Microsoft Flow account for this you can use http://flow.microsoft.com/ to create an account.

2. Microsoft Power BI: You need Microsoft Power BI account for this you can use  http://app.powerbi.com/ to create an account.

3. Microsoft Form:  You need Microsoft Form account for this you can use https://forms.office.com/ to create an account.


Indiandotnet_Microsoft_Form_1

All good now you have all the required tools.

The first step here is to create a form so, just log in to Microsoft Survey form and create a sample Survey form as shown in below figure.

Indiandotnet_Microsoft_Fom_2

Great, so we have created our Microsoft Survey form which you can access via the link

Indiandotnet_Microsoft_Form_3

Here, as mentioned in the image make sure you click “Anyone with the Link can respond” to make it publicly available.

Great, so far so good we have created our first step.

Now, Move to Microsoft Flow and after login, create a New button and choose to create blank flow.

Indiandotnet_Microsoft_form_flow_4

In the next step search Microsoft Flow as shown in below figure. We want to collect the response. So, whenever a new response is submitted our flow with the trigger.

Indiandotnet_Microsoft_Form_Flow_5

Now, when you click on “When a new response is Submitted”option (if you are already login into Microsoft form) it will show all the forms which you have created.

As shown in the figure, we are selecting “Indiandotnet- Prime Minister 2019 of India”

Indiandotnet_Microsoft_Form_Flow_6

Here, as we know there can be a bunch of response submitted using the form.

So, we need to capture each individual response and send to power BI stream database. For this, we will add Apply to Each  option and in that select Get Response detail in the action

Indiandotnet_Microsoft_Form_Flow_8

Now, in the next step we will configure it as shown in the below figure. so we are going to pickup each individual response.

indiandotnet_Microsoft_form_flow12

So, our first step is created.

Now, we need to pass the submitted response to Power BI but before that, we have to create a Streaming dataset as we created in our earlier post as well.

Login to app.powerBI.com and create a stream dataset in your workspace as shown in below figure.

Indiandotnet_Microsoft_Fow_Power_BI_8

After clicking the streaming Dataset as shown in above figure select the API option

Indiandotnet_Microsoft_Flow_Power_BI_9

Now, in the next step, we will define the dataset in which we will have the same fields which we are capturing in the form.

In our example, we captured 2 questions which are

1) your Prime minister

2) your location

Just define the fields as mentioned above. You can see I have created the same as shown in the below figure.

Indiandotnet_Microsoft_Flow_Power_BI_10

Just click on Create button to proceed further

Indiandotnet_Microsoft_Flow_Power_BI_10

Once, you created the dataset in the next step we will create a dashboard. Although, we don’t have any data yet, but can at least define.

Just, create a report by clicking the option as shown in the below figure.

Indiandotnet_Microsoft_Flow_Power_BI_12

When you click, create report option you will get report editor here we are choosing 2 simple graphs

1) Bar Graph  – which will show no of votes for each individual candidate (an option which we gave in the Microsoft form)

2) MAP – from where we got the response across the globe.

Indiandotnet_Microsoft_Flow_Power_BI_13

Now, we are done with the Power BI stream database move back to Microsoft Flow and configure the next step which we left.

Here, we are going to add Add rows to a Power BI dataset as shown in below figure

Indiandotnet_Microsoft_Form_Flow_10

Now, just configure the Power BI as shown

Indiandotnet_Microsoft_Form_Flow_11

so far so good, we are done with our configuration. Just save the Flow and hit test run.

and you will see all steps are clear. Now, check the Power BI dashboard which we have created.

Indiandotnet_Nerdtechies_flow_14

After configuring correctly, just publish the Survey and let the people fill it.

I did the same and shared the survey on Facebook.

Now, let’s move to power bi dashboard and check the graph there.

Wow, we are able to see all the live response.

Indiandotnet_Microsoft_Flow_Power_BI_15

People voted from different locations to their Primary Minister and as you can see Shri Narendra Modi is our favorite and all the people voted for him.

Please, let me know how you like this post.

Enjoy learning & Sharing Microsoft Flow, Microsoft Form & Power BI


A humble request to all the readers who are Indian and eligible to vote. Please, do cast your vote. Your vote is very important.

Choose, a capable leader in this election whom you can trust that he can speak your voice logically.

India will progress there is no doubt but choose a leader who will be with India not with terrorist and tukde tukde gange.

JAI HIND

BHARAT MATA KI JAI

MebhiChokiDAR – Tweet sentiment analysis and more using Microsoft flow

Microsoft Flow provides various templates to achieve your goal and Twitter Sentiment analysis is one of them.

In this tutorial we will see how to do sentiment analysis using few clicks and see live graphical representation using Power BI live feed.

As in India currently, #Mebhichokidar has tag is very viral. So,we are using this hashtag to cross check how it is going.

Prerequisites :

There are 3 basic prerequisites to complete this task

1) You should have Microsoft flow account if you don’t have that then you can create via link https://flow.microsoft.com

2) You should have Microsoft Power BI account if you don’t have then you can create via link  https://powerbi.microsoft.com/en-us/

3) You should have  Microsoft Azure Portal account for cognitive services if you don’t have then don’t worry you can create via link https://Portal.azure.com

Once, you have all the 3 accounts available then proceed step by step as suggest below

Step 1:-  Just open the Microsoft flow and select the template “Run Sentiment Analysis on tweets and push Result to a Power BI dataset” as shown in below figure.

Indiandotnet_Twitter_1

Step 2: When you select the option you will find below screen as shown in below

Indiandotnet_Twitter_2

Step 3:-  We have to configure 3 connection as expected  text analytics connection (Azure cognitive service) , Power BI (live dashboard) connection and last but not the least Twitter connection.

Here, As I am using an office 365 common account so my power BI already authenticated using that.

Indiandotnet_Twitter_3

Step 4:- Now,let me connect with My twitter account first. Which can be done by clicking Sign In.  In this you need to authorize the flow to access your twitter account.

Indiandotnet_Twitter_6

Step 5: In the next step you have to define text analysis connection for which you have to first login into Azure and search for cognitive service. If not exists then create  by clicking Add  button

Indiandotnet_Cognitive_Service

When you click add button you will find below link as you can see. Search Text Analytics and select the option highlighted as below

Indiandotnet_Cognitive_Service_2

Provide proper Resource Name and select  pricing tier as per your convenient. I am choosing free tier for this example.

Indiandot_Net_Vision_API_1

Step 6: Once you created the account. You need to copy the Key from Get your Keys option . and copy the Web API option from 2b as shown in below.

Indiandotnet_Cognitive_Service_3

Step 7: So, far so  good , we have created cognitive service and now moving back to Microsoft Flow  and Configure the Text analytics. Give any name in connection name and provide Account key which we copied earlier and also copy the Web API.

Indiandotnet_Twitter_4

Step 8:  Now, we are done with the connection next step is configure the steps. So, when a new tweet is posted we will provide that tweet to our Cognitive service using detect sentiment which will provide  sentiment score. The sentiment score will be given to Power BI.

Indiandotnet_Twitter_8

Step 9:   Now, click on twitter option here you can add multiple text option. For example you can see in below search text we have added NarendraModi, Chokidar or MaybheeChokidar

Indiandotnet_Twitter_9

Step 11:- Now, delete Detect Sentiment action  and add again by searching the sentiment 

Indiandotnet_Twitter_10

Step 12:  Here we will configure the sentiment option as you can see. We are giving  Tweet Text and Language (we are selecting  English Language)Indiandotnet_Twitter_13

Indiandotnet_Twitter_11

Step 13:-  Now, in the next step  we will configure the Power BI.  For which we will login http://app.powerBi.com  and click on  Streaming Dataset option  because we are  going to providing .

Indiandotnet_Twitter_12

Step 14:  Now, click on API as shown in below image.

Indiandotnet_Twitter_14

Step 15: Now, define the dataset as shown.  below here we are defining the fields. So, in the fields we are adding SentimentScore (which will given by cognitive service) , TwitterDate (when tweet posted), username (who posted the tweet),  tweetText (What is the tweet)

Indiandotnet_Twitter_15

Once, you define the dataset click on Create.

Step 16: Now, save the Report and configure the report as per your need.

Indiandotnet_Twitter_16

Step 17: Here now configure, Power BI dashboard and remove the payload. as shown in below figure.

Indiandotnet_Twitter_17

Step 18:  See the below configuration which configured.

Indiandotnet_Twitter_18

Here if you see, we defined workplace which we have created and dataset defined just above and mapped the fields.

Indiandotnet_Twitter_21

Step 19: Now, Save  the  flow and configuration and try to run it. If everything works perfectly. You will get all the checkbox.

Indiandotnet_Twitter_20

Step 20: Now, you can see the Power BI dashboard you will get the graph updating per minute with the new tweet text whenever a post with specific tag.

Below you can find sentiment score  graph.

Indiandotnet_Twitter_22

In Next post I will share the detail of this sentiment analysis data.

Hope you might like this easy way of sentiment analysis.

Happy learning.

4 tools making your life easy by generating TEST Data Load

As developer /QA it is always a challenge to check the application on different parameters and Data Load is one of them.

Sometimes it is not easy to generate the load manually and we may skip this very important process to check our application on different data load which may cause extra pain to our end users, customers and to our team as well.

To avoid this either you yourself write some scripts (I will share an easy way to generate data load by SQL Script in near future) or use some outstanding tools available in the market.

In this post, I am going to share 4 best tools available in the market which I have used and my feedback according to my experience.

You can also try with trial versions and proceed further.

1. Apex SQL Data Generator:

Apex  SQL Data Generator is one the simple tool which I tried. It provides a free trial version for play.

Apex_Test_Data_Geneator

Below are some points which I like about this tool. This tool is not an open source but you can try this with the free version.

  • Easy to use
  • Can generate Unique records
  •   option to allow NULL value in columns
  • option to generate (export) test data in SQL Script, XML,  CSV & JSON
  • Can insert data in Parent-child relationship maintain foreign key
  •   You can maintain the transaction  in the script
  •   capable enough to show different dependencies
  •   Preview data feature
  •    sampling is possible based upon the table

Although it is capable enough to generate millions of records easily I faced sometimes it is slow due to a different relationship.

I would recommend this tool if you want to try.

2. Redgate data generator tool

Redgate is another one of the famous tools available in the market.

Redgate_Test_Data_Generator

Below are some points which I like about the tool. This tool is not an open source tool. Although, you can try a free version.

  • You can generate (export) CSV
  • Easily maintain the transaction
  •   can generate rows in a batch
  •   Preview data feature is available
  •   can do sampling
  •   can use a regular expression
  •   A null value option is available
  •   a unique option is available

I like this tool as well but you need some time to understand it.

3. https://www.generatedata.com/

This is another interesting tool and a bit more advanced but simple.

generate_data_Test_Data

Below are the some features

  • Very easy to operate
  • can generate unique records
  • option to select data type like Names phone, city etc (user-friendly option)
  • Export is very advance  apart from regular export like SQL Script, XML, CSV, Excel, HTML this tool provides  generate code in JavaScript  & C# as well

Although, I didn’t find the option to maintain foreign key. In trial run you can generate at max 100 records so, you can try it easily.

4. https://www.mockaroo.com/

This is one of the advanced tools which I found so far. It gives you the various option of the data type.

mockaroo

mockaroo1

  • Easy to use
  • sampling is easy
  • the various option of data types as you can see in the above image
  • can export CSV, script, excel, Firebase etc
  • Preview data feature is available

You can generate 1000 records in the free trial. Although, I didn’t found relationship (parent-child) details in this.

I hope this might help you somewhere.

Enjoy learning and exploring new tools.